
LIGHTROOM TOOLS THAT PROPERLY USED WILL LEVEL UP YOUR EDITS
You probably already know or work regularly with Lightroom, even so, if you are just starting out and have no idea what I'm talking about or what you can get out of it, I'll tell you that Lr is Adobe's image processing software, one of the most powerful, versatile and complete in the world.
Just as in analogue, after shooting a film we have to develop it and we can play with some of the parameters during development, in digital photography we also have to carry out this development process and for this, Lightroom is a "must".
That digital image processing and colour treatment through software has become a step that has the same (if not more!) relevance than compositional skills and knowing how to squeeze the "photographic eye" at the moment of shooting is a fact. Knowing the editing tools available to us and knowing how to use them properly is key to achieving good results and even being able to give your image a creative touch in terms of colour.
There are many factors that influence the processing of an image and I will talk about them in different posts. Today, we will talk about the most powerful tools that Lightroom has and how they can help us to perfect our photo editing.
MASK OR FILTERS
Without a doubt, this is the most powerful tool in Lightroom (Lr from now on). The masks or filters are a very interesting simplification of the masks we have in photoshop. And I say simplification not because they are not able to achieve the same results, but because they allow us to get perfect results in much less steps than in giant photoshop.
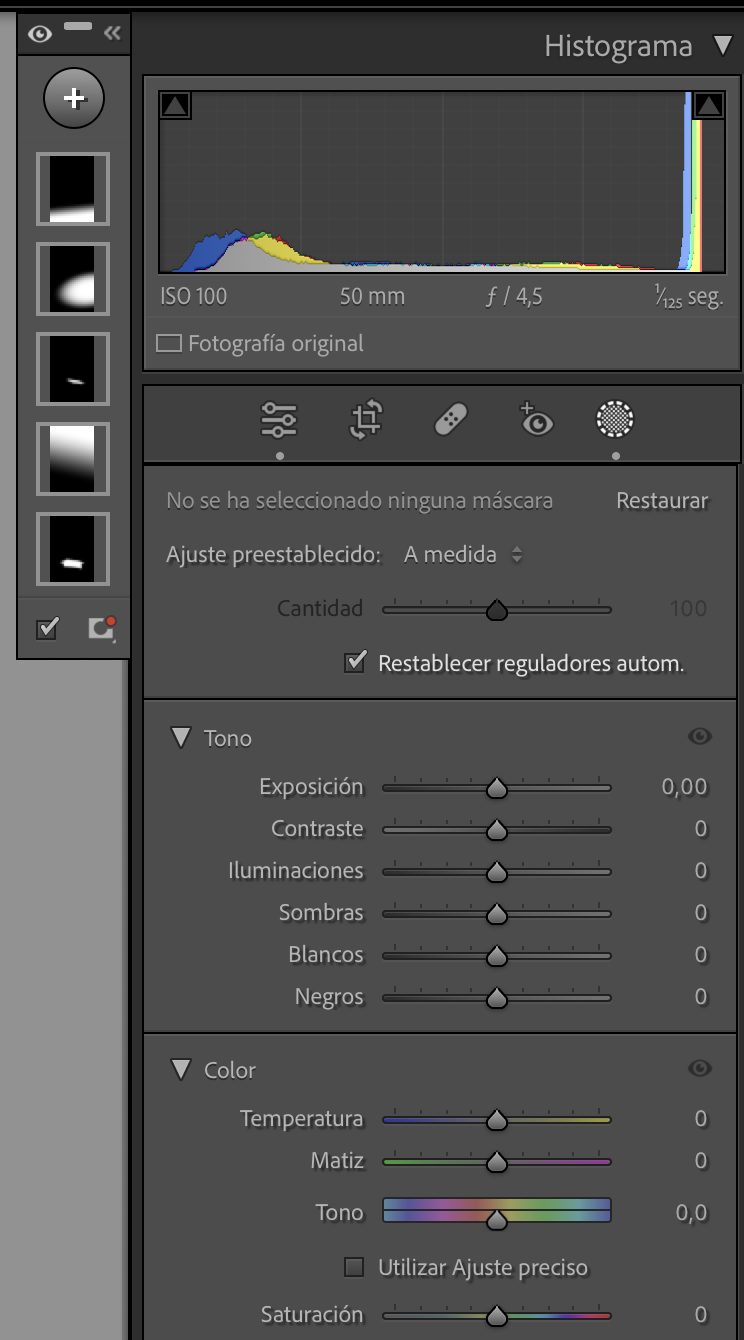
Mask panel in Lr Classic
"And what are these masks for, Mara?" Well, Lr masks allow us to edit a specific part of an image without altering the parameters of the rest of the photograph. This is very useful to darken some areas or increase their luminosity, edit faces, skin tones, objects, get a portrait emphasizing the blur in the background, edit only the tones of the sky or a road, remove reflections from specific areas of the image or even alter the colours of a specific area of the photograph. You can do almost anything you can imagine using masks.
Since I started using Lr 6-7 years ago, adobe has made great strides in perfecting the masks panel to now include curves, object detection, depth, tones and subject detection. Amazing, isn't it?
In my image processing workflow, masks play a very important part and it's what gives that "I don't know what" to make the image shine on its own.
For example, I often use my own presets as a basis for editing my photographs but as we all know, presets don't always fit perfectly with every image. After generally correcting some parameters and making the preset fit perfectly, I dive right into the use of masks.
The possibilities are endless if we know how to use them well and give free rein to our creativity.
Before and after using masks
In the above video I used 5 masks: two object selection masks over the cabin to emphasise the brown tones and lower the shadow values, a linear mask over the sky to emphasise the haze in this sunrise, another linear mask over the grass in the lower right to darken the image in this area and give more depth of field and a radial mask following the direction of the light to give it a warmer touch and give some more "power" to the light rays, a linear mask over the grass in the lower right to darken the image in this area and get more depth of field and a radial mask following the direction of the light to give it a warmer touch and give some more "power" to the light rays.
As you can see, the possibilities are endless if we know how to use them well and give free rein to our creativity.
2. TRANSFORM
This panel is amazing and, in my opinion, very underrated!
Transform panel in Lr Classic
Although its main use is to correct subtleties in the perspective of the image allowing us to play with the X axis, Y axis, aspect ratio, rotate, verticalize the image... etc. it has an amazing potential. In the last issue of the Newsletter I talked about how to get a drone perspective without having done and all using this panel. If you missed it, just click here and start learning how to get the most out of this Lr tool.
Zoom in to get bigger objects with the transform panel
3. COLOUR GRADING
Also called "Split Toning". The name itself gives us a slight idea of what this tool can be used for: to control colour nuances in the shadows, highlights, mid-tones or in general in a photograph.
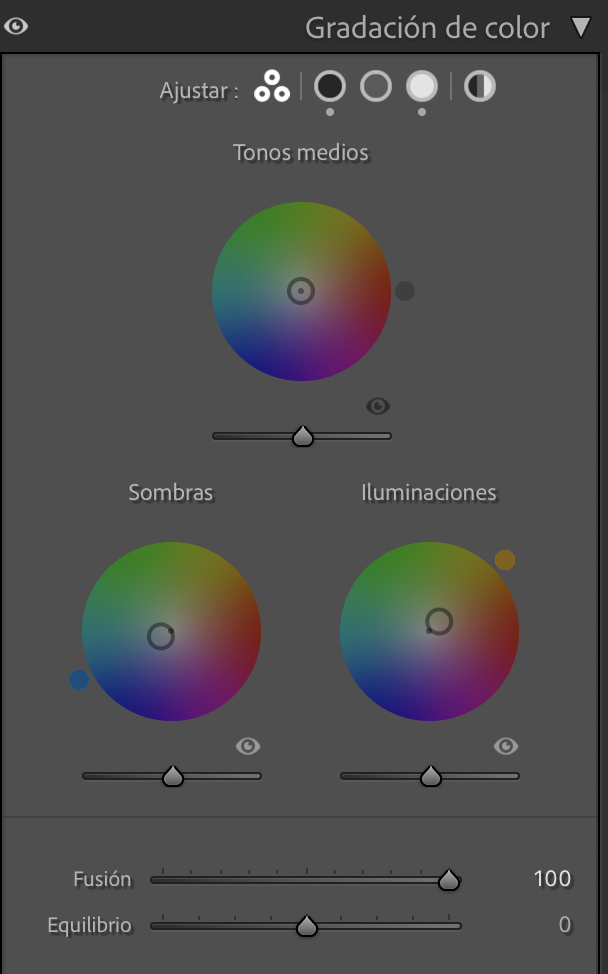
Color grading panel in Lr Classic
As a general rule, the changes that are usually made in this panel are very subtle but no less important. This panel will give a specific look to the photograph by playing with the nuances in the shadows and highlights.
I personally like to use orangey yellows in the highlights to get those warm sunrise/sunset tones that I like so much and a very slight blue in the shadows to create colour contrast. Even so, inverting the shades by making the lights a bit cooler and the shadows warmer usually gives a quite analogue result that I quite like and also use.
Color grading before & after
Like everything in editing, it's a matter of taste so I encourage you to play with the panel and the different colour combinations you can make.
4. CALIBRATION
Another of Lr's underrated panels. Well, underrated by all those amateur photographers who are just starting out, because for any professional photographer it is an indispensable panel.
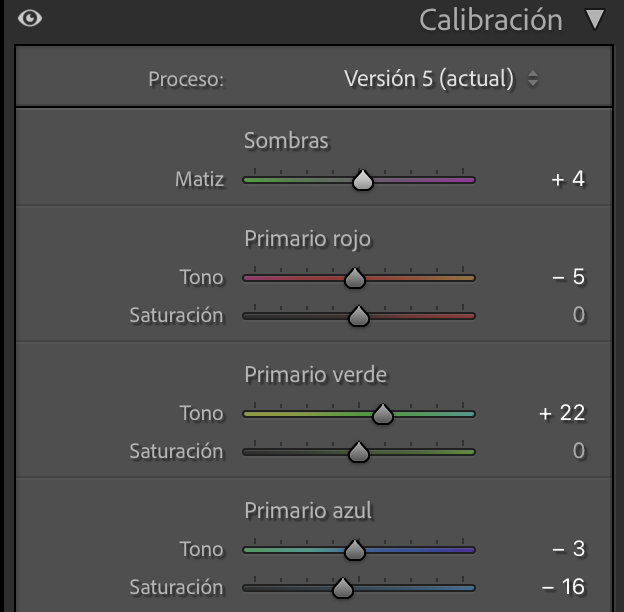
Calibration panel in Lr Classic
If I don't use presets, this is the first step when editing my images. The calibration panel allows you to tell Lr what tonal range you want to work with in the HSL panel.
Before & after calibration
And what is the important role of this calibration panel? Well, its greatness lies in the fact that it allows us to match the basic tones of any image to give them a similar colour look. I'm sure you've noticed a very chromatic social media feed, right? Well, thanks to this panel you can maintain the same colour style. I say colour because the similar style of an image also depends on the lights!
5. NOISE REDUCTION WITH AI
Many of us Lr users have already asked for an improvement in the noise reduction panel to be able to have this tool integrated and not depend on other software. It was in the last update that was released last week when we could see a substantial improvement in the noise reduction tool by including AI.

Noise Reduction panel in Lr Classic
It is still too early to confirm if it is a tool that is at the same level as other noise reduction software such as DxO or Topaz but what I can confirm after performing some tests in undemanding noise conditions is that it fulfils its function correctly and, unless you are looking to print the photograph at a large size, it looks good.
Example of how noise reduction works with AI in Lr Classic
I hope you can experiment with these tools and start to get the most out of them. Coming soon we will look at them along with colour theory so you can give your photos the look you want!
AUTHOR:
MARA DE LA TORRE
Professional travel & commercial photographer. Content creator spesialised in storytelling.
Lover of nature and capturing it through the lenses
FOLLOW ME ON SOCIAL MEDIA:
YOU MAY ALSO BE INTERESTED IN....


